
The characteristics of the LUN and how the LUN was designed play an important part in picking the proper datastore for the VM. Unfortunately, there is no visibility within vCenter Server into the characteristics of the storage. In addition, there is the issue of Storage DRS, which can allow DRS to migrate the VM files to another datastore. The last thing you want is to migrate an important virtual machine’s files to slow storage. You need to keep the important VM files located on the important datastores and the less important VM files on less important, or maybe slower, datastores. These are the kinds of problems that profile-based storage is attempting to solve.
From Web Client.
Following are the steps required to configure Profile based Storage.
- Define Category for Storage Objects
- Define Tag against the categories (You can perform 1,2 steps in one actions)
- Assign Tags/category to the Datastores.
- Enable Storage Policies
- Define Storage Policy
- Assign Storage Policy to the VMs
1-Define Category for Storage Objects
From Webclient home-> Tag-> items -> Category-> Click on “+” sign

Define the category and select the object type which associated to this category.

Verify your added categories.

2-Define Tag against the categories
On “Tag” tab -> Click “+” Sign -> Define the tag name and Select a category -> Click “OK”

Verify your added tags.

3-Assign Tags/category to the Datastores.
From Webclient Home -> Datastore -> Select your datastore -> Manage-> tags-> Click on Assign tag option.

Select your desired Tag and category from the list and click “Assign”

Similarly assign these tags/categories to other Datastores
4-Enable Storage Policies
From Webclient Home->Select “VM Storage policies”

Click on the “Enable Sign” as highlighted to enable the VM Storage Policies.

Click on the “Enable” button to enable the VM Storage Policies -> Click “Close”

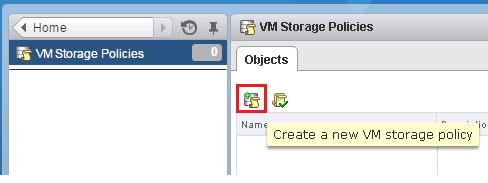
5-Define Storage Policy
Click On the “+” Sign as highlighted to create a new VM Storage Policy
In Storage Policy Wizard. Enter the Storage policy “Name” and “description” -> Click “Next”

Click “Next”

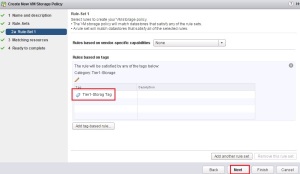
Click “Add tag-based rule”

Select the Category and Tag which you want to associate with this policy.

Verify the newly added Rule based on the tag -> Click “Next”
Wizard will automatically filter the datastore against the defined categories and tag. Verify it and click “Finish”

Similarly define other Storage Policies if you want. At the end verify your define policies.

6-Assign Storage Policy to the VMs.
To assign a storage policy to the VM. “Right Click on the VM” -> All vCenter Actions -> VM Storage Policies -> Click “Manage VM Storage Policies”
NOTE: make sure VM should be power off

Select your “VM Storage Policy” from the Drop Down and Click “Apply to Disks”
NOTE: if you want to define different polices on both disks. Just select each disk one by one and then choose the required VM policy from the Drop down and click Apply to the disks button.

If you check the highlighted setting. It shows VM Storage policy is “Not complaint”. It is because currently VM is on Local datastore and we want him to be Tier1 datastore.

To make this VM compliance. Just “migrate: the VM on the “Tier1” datastore.
Right click on the VM and start migration wizard. In “select datastore” section. Due to storage policies it will tell you which datastore are compatible to this VM. Select any of compatible datastore -> Click “Finish”

When the migration finished. It will not automatically change the status from” not complaint” to “complaint”. To Make the VM Compliant check the “VM Storage policy compliant” against the VM.
Right Click on the VM -> All vCenter Actions-> VM Storage Policies-> Check “VM Storage Policy Complaint”.

Verify your VM is in complaint state as highlighted below.

